Goods Receipt Note:
After “Purchase Order” and “Delivery Challan”, Now you have received bill of your purchase from vendor.
Step 1: Go to “Purchase” menu and click on “Goods Receipt Note-GRN”

Step 2: GRN No. is automatically generated by software, So move to “GRN Date” where current system date is appearing by default. (You may overwrite GRN date if you are going to make a pre or postdated GRN)

Note: Dates are non-editable in each form, so be careful when typing date of any form.
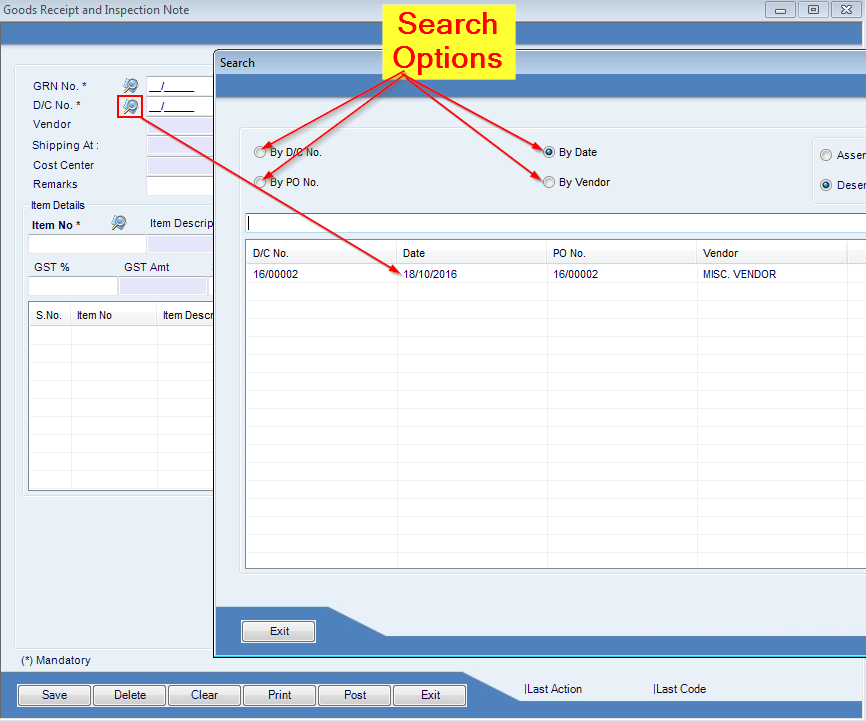
Step 3: Move to D/C No. and click on mirror icon of D/C No. Select D/C No. from list of D/Cs against which you need to make a GRN.
Step 4: Move to Document No. and write down Vendor’s Bill No.

Step 5: If some products are damaged, you can put that in rejected quantity. Double-click on the product in grid to make changes.

Step 6: Add accepted quantity, the remaining will automatically be transferred to rejected stock and vendor will be credited for the units accepted by you.

Step 7: You can change Product Rate and GST and other taxes percentages.

Step 8: Click “A” to add product in grid with edited quantity and Click “C” to clear.

Step 9: “Exempt from Tax” check box is already un-checked as you un-checked it when making purchase order. Always check “P/A Invoice”.

Step 10: Click “Post”.

Note: If there are no changes in product quantity, rate and taxes, you don’t need to edit the product and may simply click on “Post”.
Step 11: You will receive a notification, if you want to post this GRN. Click on “Yes”. You may cancel posting anytime by clicking on “No”.

Note: Once GRN is posted, you cannot edit or delete it.
Step 12: Now move to “GRN No.” and click on mirror icon. You can see list of GRNs.

Step 13: Select the GRN, and Click on “Voucher” Button to credit the purchase in Vendor’s ledger.

Note: In appeared window of “Accounts Voucher”, you can see the transaction to be routed in appropriate accounts in COA.
Step 14: Click on mirror icon of Journal No. and select the type of Journal.

Step 15: Click on “Yes” and you will receive a confirmation. Click “OK”.

Note: Now the purchase has been credited in vendor ledger and debited in your stock.

Leave a Reply